How To Use Minelab XChange 2 for EDITING - Illustrated Tutorial, page 8
3. Create and Edit CTX-3030 Tone ID Profile on Your PC or Laptop
The XChange 2's User Mode Editor allows you not only to create and edit Discrimination patterns of the current User Search Mode, but also set up its Tone ID Profile (also called "Audio Setup" or "Tone ID Map") in the most easy way on your Personal Computer (PC) or laptop.
If you are going to modify the Tone ID Profile for the first time and you do not have your current User Mode in the XChange 2 yet, please complete steps 4 - 11 in the "How To Use XChange 2 For Editing Discrimination Patterns" section of this tutorial, and then return to this section.
If you have just finished modifying the Second Discrimination pattern of the current User Mode, and want to switch to the Tone ID Profile screen, simply
1) click on the "Tone ID Profile" tab.
When you click on the "Tone ID Profile" tab (the tab will highlight blue, and the Discrimination Pattern tab will turn light-green), the Tone ID Profile Editor screen opens up and shows the Tone ID Map overlaid on the currently active Second Discrimination Pattern. Now you can make any modifications to the current Tone ID Profile, or create a new one.
Tone ID Profile Editor Screen Shows "50 Conductive Tones" Audio Setup in Profile Window
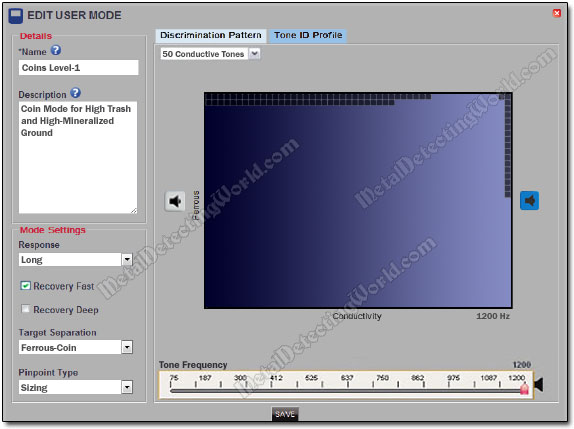
When the "50 Conductive Tones" mode is selected, two "Play Tone" buttons appear on the editor screen: one button ![]() (not activated) is located to the left off the profile window and corresponds to the lowest CO value; and another one - blue-highlighted (activated),
(not activated) is located to the left off the profile window and corresponds to the lowest CO value; and another one - blue-highlighted (activated), ![]() is located to the right off the window and corresponds to the highest CO value.
is located to the right off the window and corresponds to the highest CO value.
Also a Tone Frequency (Tone Pitch) Scale ranging from 75 Hz to 1200 Hz is located at the bottom of the screen.
NOTE: Depending on the type of the Tone ID Profile selected, there may be from one to five "Play Tone" buttons on the screen. And each button is positioned next to its corresponding tone section ("bin"). At this point, you do not have to be concerned about either these buttons or the Tone Frequency scale, so disregard them until you get to the "How To Play and Change Tone Pitches of Tone Bins" section on page 11 of this tutorial.
Also, the Mode Settings are available on this Tone ID Profile Editor screen and grouped the same way - boxed in the lower left corner, just like on the Discrimination Pattern Editor screen. This arrangement allows you to easily adjust the Mode settings on either of these screens.