Metal Detecting Search Program Settings for Minelab Explorer, XS, II and SE Pro
Detect Oldest Coins and Relics Buried Deep
The current Metal Detecting Program, a combination of parameter settings, set up on my Minelab Explorer metal detector is a result of "Try and Error" process that have been continuing for past few years.
My goal in creating an optimal program was to be able to metal detect deep targets under any soil condition that I might encounter at different geographic locations.
The users of the Minelab Safari metal detector might obtain a few useful tips from studying my program as their metal detector settings are similar to the ones of the Minelab Explorer series.
Even though Explorer's 28 Simultaneous Operating Frequencies of the Full Band Spectrum (FBS) allow me to detect without a trouble anywhere in the world, I still would like to detect the deep coins and relics while encountering toughest soil conditions. The following program enables Minelab Explorer SE and II Pro to detect a few more desirable finds at the locations where other treasure hunters quit searching long time ago.
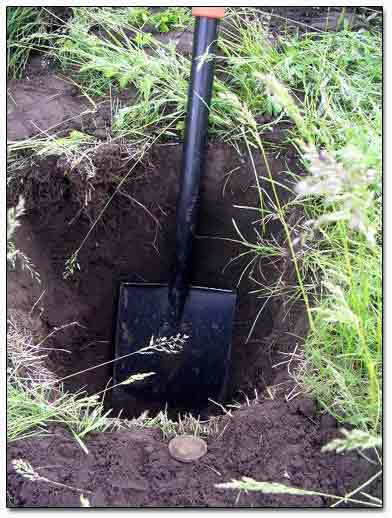
The picture above shows the deepest hole that I had ever dug up at the "hunted out" site to recover a large coin, circa 18th century. You can read my full story on Detecting "Hunted Out" Site pages.
The changeable parameters are divided into two groups for better understanding of their utilization:
Group A includes the parameters that I do not change every time I encounter different metal detecting conditions such as the type of soil, concentration of junk, and type of the top cultural layer.
Group B includes only two parameters, Sensitivity Level and Discrimination Pattern, that I change even a few times during the treasure hunt according to the site conditions.
I operate my Minelab Explorer only in ADVANCED Mode with Sensitivity set up on MANUAL, and with Tone ID.
Group A Settings:
DISPLAY CONTRAST - at 10
AUDIO VOLUME - Max Limit at 10
NOISE - at 5 (if interference from the power lines, other metal detectors, etc. is absent)
RESPONSE - Audio 1
RECOVERY: FAST - OFF and DEEP - ON
GAIN - at 8 (even a deep target produces a loud signal) - Sometimes I lower the Gain level down to 7 when the junk concentration is high.
TH (threshold) TONE - at 5 (on Explorer XS) and 8 (on Explorer II)
VARIABILITY - at 10
LIMITS - at 10
SOUNDS - on FERROUS (medium size ferrous targets do not respond with a high pitched tone as if of silver)
Group B Settings:
SENSITIVITY - usually as high as possible - a notch below a setting that makes my detector unstable, which is allowed by trash concentration, soil mineral content, and the search coil's size.
To read about how the Sensitivity settings affect the detector's performance, visit my Article - How To Search Around Cellar Holes Successfully.
Sensitivity Settings for different sizes of Double "D" Waterproof Search Coils:
15 inches WOT Coil - 10-20
10.5 inches Standard Coil - up to 28
7.25 inches Coil - up to 32
Learn Your Metal Detector's Language and Its Full Potential Through Understanding the Instruction Manual, Practicing, and Experimenting
DISCRIMINATION patterns vary greatly. I utilize IRON MASK for all types of metal detecting: I always keep IRON MASK setting at -16 and in OFF mode, and switch it ON only when I need to check a questionable signal.
I usually utilize the Explorer's Discrimination factory settings and patterns to create desirable Discrimination patterns. Occasionally, I use LEARN and EDIT option programs in ADVANCED MODE to adjust Discrimination pattern for a particular target.
My Basic Discrimination patterns:
For Relic Hunting and Cache Hunting:
REJECT:"Nail"
ACCEPT: everything else
For Coin Shooting:
ACCEPT: "Coins", "Jewelry", "Foil", "Pull Tab", "Screwcap"
REJECT: "Fe Coins", "Crowncap", and "Nail"
This combination of settings is just a starting point for developing your own program according to your preferences and metal detecting conditions. My program is only to help you in doing your home work. Use the program for experimenting with various targets in field conditions, and see what settings work the best for you.
Please let me know your opinion on my program after you use it. You are welcome to submit some pictures of your finds recovered with my program. I would appreciate any suggestions, tips, and constructive criticism. If you have a program for Deep Search that you believe is more productive than mine, I would be happy to post it here. Good Luck and Happy Hunting!
If you want to read about how the Minelab E-Trac is different from Minelab Explorer II, you can read my report on E-Trac Field-Test.
You can find and compare Specifications, Features, Prices, Users' Reviews and Ratings - all helpful Information, for all models of Minelab and other brands of metal detectors available on the market today at Metal Detector Reviews Main Page.