Minelab E-Trac Field-Test Report by an Experienced Treasure Hunter, page 1
PROS and CONS of E-Trac's Design, Comparison to Minelab Explorer II Metal Detector
NOTE: Even though the Minelab E-Trac looks exactly like the Minelab Explorer and uses the same FBS technology, E-Trac is NOT an "upgraded Explorer"! The only reason I compare these two machines is for the sake of the long-term Explorer users like myself who has upgraded to the next level of the Minelab's metal detecting technology.
Because I had used the Minelab Explorer metal detector (detector de metal) for eight years before I started using E-Trac, I obviously developed certain habits for Explorer's visual graphics, features and functions. That is why my personal opinion on some E-Trac's features and functions is biased. Please remember this when you use my opinion while forming yours.
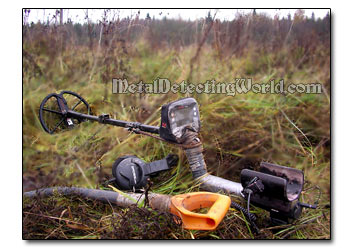
TABLE of Contents:
1) User's Manual - page 1
2) Liquid Crystal Display - page 1
3) E-Trac Xchange - page 1
4) Discrimination Pattern - page 2
5) Body Design - page 3
6) Field-Test - page 4
User's Manual
While reading the user's manual for the first time, I realized that E-Trac is quite different from the Explorer, even though E-Trac has the same technological concept and the Explorer's physical body!
Because of my long experience with the Explorers, it did not take me too long to figure out the E-Trac's functions and features, and to create a proper combination of settings for the local metal detecting conditions (the program settings are described in My Program for Minelab E-Trac). But I have to admit that reading the user's manual was not easy: a few points in the manual were hard to understand on a first reading even for me who had used the Minelab Explorers for almost a decade!
Like the Explorer's manual, the E-Trac's instruction manual is written in a professional language. I am not sure whether it is possible for the person who has never used the Minelab Explorers or never metal detected before and is not familiar with technical terms to correctly understand everything written in the user's manual! One certainly has to reread the instruction manual many times!
I did not feel comfortable with the way the descriptions of functions and features are organized in the booklet. A few times, I had to look through the booklet to find information on a certain function in a different section of the manual. But, of course, it is a matter of personal taste. However, the functions and features and their interaction with each other should be explained in details and in a simpler language (you may want to read my description for the Level-1 'COINS' Search Program in which ALL SETTINGS and MODES ARE EXPLAINED).
Liquid Crystal Display (LCD)
E-Trac's Liquid Crystal Display has a larger viewing area than the Explorer's. The new keypad layout is truly ergonomic and comfortable to use. With the new format and layout of Menu now, it takes less time to access all of the E-Trac functions and settings and quickly adjust them.
Another great novelty is that, in the Pattern Screen mode, both the Target Crosshair position (according to the targets's FE-CO properties) and the numeric values of the target's FE-CO coordinates (coordinates of Target Crosshair on the Pattern Screen) are displayed on a single screen. This Visual ID format provides the user with all visual information to help identify targets. The user can switch to a Digital Screen by pressing the Detect button and see only the large-sized FE-CO values of detected targets.
With all the improvements and innovations, I experienced a few inconveniences with the E-Trac's on-screen graphics design during my test hunts. First, I had to "readjust" my perception for the E-Trac's Smartfind - a two dimensional scale of discrimination, because the Conductivity (CO) and Ferrous Characteristics (FE) axes now run quite differently from the way they are set up on the Explorer's display.
For example, when a square iron nail is detected, the Target Crosshair, a rectangle moving within the Explorer's Smartfind window, is positioned in the upper left corner of the window. On the E-Trac's Smartfind window, the Target Crosshair is positioned in the lower right corner when indicating the nail being detected.
The E-trac's Target Crosshair is smaller than the Explorer's and sometimes is hard to see on the screen in daylight. Also, both the small Sensitivity number and a gray bar of 'Suggested' Sensitivity are hard to see in a dim daylight when, for instance, the sky is overcast.
As an experienced treasure hunter, I usually pay more attention the Audio Tone ID more than visual information on display. I do not look at the screen every time I get a signal unless I really need a visual info for better target identification or to see the target's depth.
During this field test, I needed to know the target's depth a few times but had a problem seeing the Crosshair moving within the Depth Gauge!
If one sets the LCD's contrast up to the maximum, it will be harder to see visual information. 15 is probably the optimal setting for Contrast. The worst began after the muddy stains spotted the screen - the usual and unavoidable case which occurs when metal detecting takes place in wet fields during the rainy months of fall.
The Depth Indicator is positioned way too far and low to the right on the Smartfind screen and is impossible to see when the protective cover gets dirty. The Explorer's Depth Indicator was easier to see because it was just a black bar, I could see it even in a dim light. The E-Trac's Depth Indicator is invisible under the dirty protective cover which I finally removed for better view of display readings. I would prefer the Depth Indicator to be just a large number showing the target depth in inches. In a current form, it was useless.
I'm happy that the E-Trac's audio multi tones are more distinct in sound than the multi tones of Explorer. Thus, only the E-Trac's excellent audio Tone ID helps in overcoming the difficulty in getting visual target identification info off the E-Trac's display in dim light conditions unless you use the display Backlight (it shortens battery life).
E-Trac Xchange
Another great feature of the E-Trac worth noting is the E-Trac Xchange. It allows you download and upload detector settings and Discrimination Patterns via a USB port positioned on the left side of the control box. Through this USB port, the detector can be connected to a Windows-based computer or lap-top (which is great while hunting in the fields!) to quickly configure the E-Trac to specific metal detecting conditions and preferred targets, save, share and manipulate specific settings.
A number of files containing effectively working settings and discrimination patterns for specific types of treasure hunting are posted on the Minelab web site. Now, through the use of the Xchange software, users from around the world can share their settings and patterns via the Internet.
