My Search Programs for Minelab E-Trac and CTX 3030 Metal Detectors
Create, Edit, and Save Discrimination Patterns on E-TRAC's CONTROL PANEL, page 15
You can create and edit the Minelab E-Trac's Discrimination patterns only by using the detector's Control Panel. Unlike the Minelab CTX-3030's XChange 2 application, the E-Trac's Xchange does not allow you to edit Discrimination patterns on your Personal Computer (PC) or laptop and only allows you to download and save them to your PC, and upload them into your E-Trac. With Xchange, you can only modify the E-Trac's Program Settings and either save them to your PC, or upload them to your detector.
It is very easy to create and edit Discrimination patterns right on the E-Trac's Control Panel because all Edit options are grouped at one place - on the Edit Screen. To access the Edit Screen,
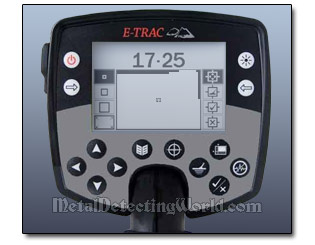
1) press the Menu button ![]()
4) Scroll across to Discrimination using the Left ![]() or Right
or Right ![]() Navigation button
Navigation button
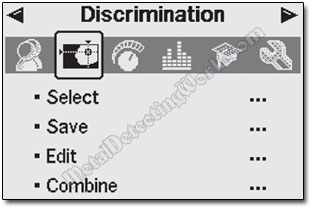
5) Press the Down Navigation button ![]() , scroll down and select "Edit" option in the Discrimination Menu (page 44 of the E-Trac Instruction Manual).
, scroll down and select "Edit" option in the Discrimination Menu (page 44 of the E-Trac Instruction Manual).
If you enter the Edit Screen from the current Pattern/Digital Screen, its Discrimination pattern will be displayed on the Edit Screen. If you enter the Edit Screen from QuickMask, the Edit Screen will display the QuickMask Discrimination pattern (see details on editing the QuickMask Discrimination pattern on page 12).
When in the Edit screen, you can choose the editing mode from four Edit Mode options - one Manual and three Auto, displayed on the right side of the Smartfind window; with the Edit Frame Size options being on the left side, as shown on a diagram below.
Summary of Edit Screen
With Edit options available on the Edit screen and FE-CO coordinates displayed in real time as you move the Edit Frame across the Smartfind window, you can create a Discrimination pattern of any complexity.
Please refer to pages 4650 of the E-Trac User Manual where editing procedures of all Edit Modes are well explained.
For example, by using the 'AUTO ACCEPT' edit mode, you can create Discrimination patterns for specific targets such as gold, silver or copper coins of certain types through either air-testing the coins or actually detecting them under real conditions in order to accept them into the Smartfind Discrimination Pattern.
If you wish to create a new Discrimination pattern using the 'AUTO ACCEPT' edit mode, you can use any current pattern to begin with. To make it all black (reject),
1) press the Left Shift button ![]() on the Control Panel to scroll through the Frame Sizes;
on the Control Panel to scroll through the Frame Sizes;
2) Select the All Pattern Edit Frame ![]() and Press the Accept/Reject button
and Press the Accept/Reject button ![]() TWICE to reject (blacken) the entire Discrimination Pattern. This fills in the Smartfind Window, rejecting all targets and preparing the Smartfind window for learning a new target. I carry out this procedure when I create a new Discrimination pattern in MANUAL Edit mode as well.
TWICE to reject (blacken) the entire Discrimination Pattern. This fills in the Smartfind Window, rejecting all targets and preparing the Smartfind window for learning a new target. I carry out this procedure when I create a new Discrimination pattern in MANUAL Edit mode as well.
NOTE 1: The Edit Frame can be configured to 3 different sizes: Small, Medium and Large. Keep in mind that the Large Edit Frame is better for accepting desired targets, and the Small Edit Frame is better for rejecting undesired targets and minimizing the risk of masking the desired targets.
NOTE 2: Before using any of the 'AUTO' edit modes, set TRASH DENSITY to LOW to get stable FE-CO coordinates of detected targets. If you keep the TRASH DENSITY setting HIGH and use the AUTO ACCEPT mode, the detected target's FE-CO coordinates will register as white squares all over the blackened Smartfind window. Same goes for the AUTO REJECT mode.
The Manual Edit Mode (page 46 of the Instruction Manual) allows you to perfect the Discrimination patterns created by the 'AUTO' edit modes and create simple "general" patterns for accepting/rejecting a wide variety of targets.
How To Save Your Edited Discrimination Pattern
DO NOT Press the Menu button ![]() right after you edited your Discrimination pattern still remaining on the Edit Screen. Pressing this button will take you back to the Discrimination Menu and all changes made to the Discrimination pattern will be lost. To save your pattern, follow these steps:
right after you edited your Discrimination pattern still remaining on the Edit Screen. Pressing this button will take you back to the Discrimination Menu and all changes made to the Discrimination pattern will be lost. To save your pattern, follow these steps:
1) Load your edited pattern into Detection Screen (Pattern or Digital) by pressing the Detect button ![]()
2) Answer 'Yes' to the dialogue to return to the Pattern/Digital (or QuickMask) Screen with your new Discrimination Pattern;
3) NOW press the Menu button ![]()
4) Scroll across to Discrimination (using the Left ![]() or Right
or Right ![]() Navigation button)
Navigation button)
5) Press the Down Navigation button ![]() and scroll down to 'Save', or 'Save QuickMask' - if you have entered from the QuickMask Screen
and scroll down to 'Save', or 'Save QuickMask' - if you have entered from the QuickMask Screen
6) Press either the Left ![]() or Right
or Right ![]() Navigation button to enter the SAVE sub-menu. The SAVE sub-menu allows you to save the current Discrimination Pattern to one of the empty slots or overwrite an existing Discrimination pattern. If the SAVE sub-menu is entered from QuickMask, instead of the Pattern/Digital Screen, the sub-menu will be titled 'Save QuickMask'.
Navigation button to enter the SAVE sub-menu. The SAVE sub-menu allows you to save the current Discrimination Pattern to one of the empty slots or overwrite an existing Discrimination pattern. If the SAVE sub-menu is entered from QuickMask, instead of the Pattern/Digital Screen, the sub-menu will be titled 'Save QuickMask'.