Decipher Questionable Signals with Minelab FBS Metal Detectors, page 3
How To Discern Ambiguous Responses To Coins Close to Nails with Minelab CTX 3030
With Minelab's FBS 2 technology, a signal is analyzed from a wide range of responses - 28 in total. This allows the CTX 3030 metal detector (detector de metal) to analyze 28 times more target information than a single-frequency detector is allowed to process, and, therefore, the target identification is not only considerably more accurate under normal metal detecting conditions, but also remains that way under adverse conditions.
Superiority of the Minelab FBS detectors to other brands' metal detectors also manifests itself in situations related to QUESTIONABLE responses to coins lying in close proximity to iron nails. Metal detectors of other brands do not have such effective means for dealing with ambiguous signals. The Minelab Smartfind 2 system along with the FBS 2 technology make it fast and simple for the CTX-3030 users to discern responses to coins among iron falsing.
Upon hearing a questionable response of the Coin+Nail type (described on page 1), you should use the following CTX 3030 features for signal analysis:
1) Second Discrimination Pattern on the Detect screen; its Smartfind-2 window - a 2-Dimensional Phase-Shift Scale, showing the target's FE-CO properties both numerically and graphically;
2) "COMBINED" Tone ID Profile + "Nails-Accepted" Discrimination, or "50 tone CO" + "Nails-Rejected" Discrimination settings that are utilized with the Second Discrimination Pattern;
3) "FERROUS-COIN Target Separation" (if mineralization is not TOO HIGH) that is utilized with the Second Discrimination Pattern;
4) Target Trace showing in real time one of four typical traces; with Target Trace in conjunction with Target Separation features, you can identify multiple targets simultaneously;
5) Pinpoint mode (activated by pressing a trigger) set to "SIZING";
6) Target Trace Pinpoint (page 12 of the Instruction Manual) will help you avoid pinpointing an unwanted or wrong target;
7) Numerical Depth Indicator (shown on Target ID Panel);
To analyze an ambiguous target signal, you should follow these steps:
1) Switch to the Second Discrimination pattern (examples are shown on previous pages of this section) created to be used in conjunction with "COMBINED" + "Nails-Accepted" Discrimination, or "50 tone CO" + "Nails-Rejected" Discrimination, and with "FERROUS-COIN Target Separation" (if mineralization is not TOO HIGH), and Target Trace (to enable it, press and hold the Detect button to open the Detect Screen Quick Menu);
NOTE: All these features should be implemented in a different Search Mode with its own Second Discrimination pattern IF the current Search Mode has different program settings so that its Second Discrimination pattern cannot be used for this procedure.
2) Sweep a search coil, with extremely narrow and slow coil movements, over the signal spot. Make sure you get the most vivid Target Trace on the color Smartfind-2 display and the most stable FE-CO reading by approaching the spot with a search coil from different directions or simply TURN 90° on it. If the target trace looks like either VERTICAL or DIAGONAL and "travels" to the Conductivity area as shown on pictures below, most likely you got a coin (it also could be any other non-ferrous target of course) under the search coil.
Vertical and Diagonal Types of Target Trace on CTX 3030

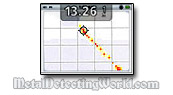
Just to remind you that Vertical Trace indicates the High-Conductive coins + Ferrous junk, and Diagonal Trace indicates the Low-Conductive coins + Ferrous junk. If the target trace looks like a bland splotch on the screen (shown on a picture to the right), you got a rusty junk under the coil, and if there is no target trace at all (not even the slightest hint of it) on the screen, you could either investigate the signal further or just leave this signal out and move to the next target - it is up to you!
If the "coin" Target Trace travels from the "nail zone" to an area lying between the FE-17 and FE-28 lines, the target definitely should be investigated. And this area must be accepted in your Second Discrimination pattern so that you could hear responses "landing" there.
If the coin is buried deeper than seven inches, you would still get an audio response but you may not get some visual information - an Accepted Target Crosshair and the FE-CO values. However, if you see very weak target traces, vertical or diagonal, on the screen, that would be enough reason for digging the target. The main objective now is to make the FE-CO readings appear on the screen. A certain position of the search coil and/or removing a couple of inches of dirt off the ground surface could help.
4) If you succeed in doing so, you need to keep an eye on the CO number to see if it shows some consistency - THIS IS IMPORTANT! You should not pay much attention to the FE number for reasons explained on a previous page (analyzing target signals with E-Trac).
If you notice that the CO value changes by 1-4 units with every sweep of the coil, or has the same reading upon every third, or even fourth, sweep, you may want to dig up the target without any further analysis.
5) But if you are still not sure that your good non-ferrous target is not just a large bundle of aluminum wire or anything else of a large size, enable the Target Trace Pinpoint by pressing and holding the Detect button to open the Detect Screen Quick Menu. Press the trigger and pinpoint the target.
Do not activate pinpoint when a search coil positioned directly over the target or the target will be masked out by auto-retuning feature. For Pinpointing procedure, refer to page 27 of the Manual.
The Target Trace Pinpoint feature will help you pinpoint a right target, and, just like the Target Trace, give you enough information to decide whether to dig the target or not. While pinpointing, watch where the pinpointing events are graphically accumulated on the screen: if they are all in the Conductivity zone, you are pinpointing the right target.
At the same time, listen to the duration of sound - the "size" of audio response in non-motion, and observe the Depth Gauge. Keep in mind that this gauge is factory-calibrated only for coin-size objects. If you accidentally pinpoint an unwanted or rejected target near the coin, the depth gauge will show depth indication for a junk target as the gauge is updated for rejected targets, and the Smartfind-2 Discrimination patterns are temporarily disengaged during pinpointing.
While pinpointing the right target, if the gauge indicates a "deep target", and the audio response is also "large", or the depth gauge shows no depth, and the size of the "screaming" response is larger than your search coil, the target is most likely of a big size, but not a coin.
It usually takes an experienced detectorist a couple of minutes to complete all five steps of this analysis, and less than 30 seconds to recover a coin with use of an electronic pinpointer, probe or inline probe. This procedure is very easy to do and will become your second nature after some practice. And you can develop your own technique and come up with some tricks for analyzing the dubious responses of coins. The major rule in dealing with questionable signals is simple: if you notice any consistency in the target's CO readings, and you hear the high-pitched tone, dig the target!
Make a Donation
Please help me stay afloat, afford more metal detecting trips with field-tests and experiments to create more informative articles, useful tutorials and helpful guides for detectorists, and maintain this website - the most informative hobby resource on the web! Since I do not have any steady income, any donation matters to me a lot! Thank you kindly!
Clicking on the donate button will take you to a donation page powered by Donorbox and dedicated to my website (MetalDetectingWorld.com). The donation page is PCI-compliant, secured by SSL/TLS, and has a simple form to fill out. Donorbox does not store any card or bank data. Credit card information is encrypted and tokenized by the Stripe payment processor.
This website would not exist without the advertisements we display and your kind donations. If you are unable to support us by viewing our advertisements, please consider making a Donation to ensure the future of this website. By helping me keep this website alive and growing, you will sure help many detectorists around the world as well!
ANNOUNCEMENT:
In January of 2020, I started a one-time fund-raising campaign in attempt to accumulate enough money to buy a simple but reliable 4x4 vehicle. My old 4x4 car (made in 1995) had faithfully served me for 10 years before it eventually went beyond repair last October. Without a 4WD, I will not be able to get to my hunt sites and test-plots hidden in the remote wooded areas inaccessible by a regular car.
Unlucky for me, those sites are the only locations available and suitable for my field-work which results in informative articles you can find on this website. For the past 10 years, my usual field-work has consisted of field-testing the latest metal detectors and accessories, experimenting with some of them, and devising new effective search methods that meet the requirements of the new metal detecting reality.
Before my car died, I managed to finish a couple of interesting detector-testing projects which will be covered in my upcoming articles. But other equally important projects that I was working on were not completed and had to be postponed until the Spring 2020. I hope that this fund-raising campaign will help me get a decent 4x4 by then so that I will be able to resume my work and to write more new articles, tutorials and guides based on data gathered through testing and experimentation.
If you find my website useful and would like it to provide more essential info for you and other detectorists worldwide, please consider chipping in $5, $20, $50 or whatever you can afford to keep MetalDetectingWorld.com growing in 2020. I promise you, it will be money well spent. Thank you.
Donate- Please help me promote this article:
If you would like to follow me on Twitter, please press a button:

I have my profile page on
where you can share your thoughts on this article, ask me a question, or place a friend request.I also have my profile pages on Pinterest, LinkedIn, Tumblr, Reddit and Delicious
and my "Metal Detecting World" page on Twitter, Pinterest and Tumblr
I no longer maintain my old Facebook page