How To Clean Coins and Jewelry with Electrolysis - A Detailed Tutorial, page 16
Prepare Electrolytic Cell for Coin Electrolysis
(...CONTINUED from Previous Page)
7) How To Make A Good Electrical Contact
Quite often, the following happens: an electronic circuit is assembled - everything seems to be connected correctly, and the electrolysis machine is turned on, but the process does not start. The main reason for this malfunction may be the copper coin's crusted surface: the crust is not electrically conductive and, therefore, blocks electric current.
To allow DC current to run through the encrusted coin, it is necessary to make a good metal-to-metal electrical contact between the coin and the cathodic power connector - an alligator clip or a battery clamp. In case of cleaning Find a good connection point for the power clip on the coin, where the crust is absent. But you still need another electrical contact point - on the coin's part that will be submerged into electrolyte, which will provide contact with the electrolytic solution.
And this is a tricky situation: you can either make the contact points by mechanic means and accidentally damage the coin or you use a different cleaning method. This is totally up to you to decide. This is another good reason for not subjecting fully encrusted ancient coins to electrolysis.
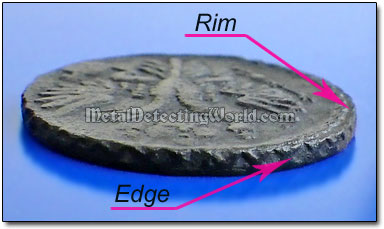
While it is easy just to file, scrape or grind the rust off the connection and contact points on an iron relic prior to electrolysis, it is hard, often impossible, to find the most undamaging way to make contact points on the encrusted copper or bronze coins. If you have to clean a coin that may be of high numismatic value, bring it to a professional conservator or use alternative cleaning methods such as long soaking in Olive Oil, Immersion into Heated Mix of Lemon Juice and Olive Oil, and "Galvanic Cleaning of Coins" or other methods described in my "Coin Cleaning Guide". If the coin is not valuable, go ahead and file the corrosion layer off the coin's rim and edge.
8) Choose a Proper Place for Setup
Because the electrolytic coin cleaning generates gaseous hydrogen and oxygen, one has to make sure that the mixture does not accumulate to reach an explosive concentration. This is why the procedure must be conducted in a very well ventilated area, and away from anything that can produce sparks or flames. The place of your electrolytic setup should be fairly isolated from human and animal traffic.
9) Time Duration of Cleaning Process
Time required to clean the coin will depend on these variables:
• Size of the coin - obviously, the larger the coin, the longer time it will take to remove the corrosion, gunk and crust.
• Amount of Current/Voltage Applied - the more current/voltage, the faster the process, but one must keep the current/voltage settings within allowable ranges to avoid destroying your electrolysis setup and/or compromising your safety (details will be in the "Controlling Voltage and Current" section).
• Amount of Crust on the Coin - cleaning time for the moderately encrusted coins varies from 15 to 30 minutes. Heavily encrusted coins will require longer time duration for complete crust removal.
• Size of Anode - the larger the anode, the faster the coin cleaning process.
• Distance to Anode - the closer the coin's surface, which is in direct view of the anode (the highest "line-of-sight" effectiveness), to the anode, the faster the coin cleaning process. So the more anodes you use to provide the line-of-sight for most of the iron object's areas, the less time you will need for complete derusting.
 If you need to stop the process and leave the coin in the electrolyte overnight, DO NOT switch the power off! If you use the battery charger, switch the voltage to 12 volts, turn the amperage down to a miniscule amount (≤200 mA), and have this small current flowing through the coin to ensure it is protected from any corrosive effects. However, it is best to take the coin out of the electrolytic cell, rinse thoroughly and place it in distilled water until your next electrolysis session.