Electrolytic Removal of Rust From Iron Artifacts - A Detailed Tutorial, page 37
8. How To Derust Iron Cannon Balls, Mortar Shells and Grape Shots
Removal of rust from iron cannonballs, mortar shells and grape shots with electrolysis seems to be impossible if a regular electrolytic setup is used. Establishing a good metal-to-metal contact between a cannonball and a cathode is usually a big problem due to the cannonball's round shape.
This problem can be simply solved without inflicting any damage such as drilling a hole to the artillery artifact. Adding just a few additional components into an electrolytic setup preserves integrity of historical relics and makes their derusting an easy task.
Most of the cannonball-cleaning setup consists of the same components as in a regular setup:
1) Large Plastic Container - large enough for a cannonball to be fully submerged, and for a large, encompassing field of voltage to develop.
2) Two or More Mild-Steel Plates - anodes, to surround the cannonball; thus, providing optimal "line of sight". All anodes form one big anode by means of anode connecting sets (see details in the "Making Connecting Sets" section on page 10).
Additional components include the following items:
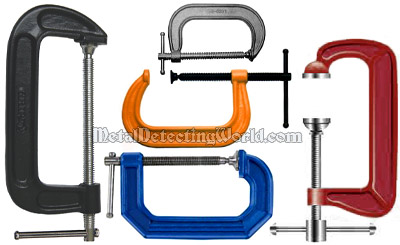
3) C-Clamp of a proper size - to provide a tight contact between a cannonball and a contact pin (cathode), and to suspend the cannonball in electrolyte.
C-Clamps of Various Sizes for Cleaning Artillery Shells
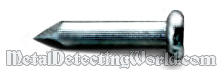
4) Contact Pin with a sharp tip - to establish a good metal-to-metal contact with a cannonball, otherwise one would have to drill a hole in the cannonball and screw in a tap screw. If a cannonball has small cracks on its surface, the contact pin should be inserted into a crack for a better electric contact.
Contact Pin
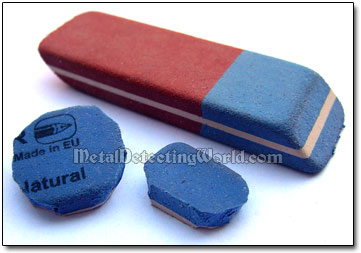
5) Two Non-Conductive Pads - to insulate a contact pin from the C-Clamp at the contact point with the C-Clamp's pressure pad, and to insulate the cannonball from the C-Clamp's anvil at the contact point. If these pad-insulators are not used, most of the current will travel through the clean, electrically less resistant C-Clamp instead of the cannonball, and the electrolytic derusting of the cannonball will take forever while most of energy will be wasted for removing baked enamel finish (or powder coating, paint, etc.) off the C-Clamp.
You can make the insulating pads out of various non-conductive items available in your household - plastic bottle cups, rubber mats, etc. I used what I had at hand - an eraser, and cut two round pads out of it.
Two Insulating Pads and Eraser from Which They Can Be Cut Out
6) Cathode Connecting Piece of black insulated wire - for connecting the contact pin to a negative power clamp of the car battery charger. This cathode wire should be stripped of insulation THREE INCHES or less at one end, so that it could be wound around the contact pin with a minimum exposure to the electrolytic solution. Otherwise, much less amount of the current will flow through the cannonball. The wire windings can be soldered together for a good contact. And a loop should be made at another end, to which a power clamp could be connected.
Cathode Wire Is Attached to Contact Pin

The way you set and connect the cannonball by means of a C-Clamp is depicted on a picture below.
Using a C-Clamp for Electrolysis of Cannonball

As the artillery ammunition of the 16th-18th centuries - cannon balls or round projectiles, round shells or mortar shells, grape shots and hand grenades, was made of cast iron, its de-rusting should not be a fast going process - the slower the better. Just make sure that most of the current flows through the cannon ball. After you prepared all components of your electrolytic setup, follow the operational steps described in "The Process of Electrolysis" chapter, starting on page 16.