Electrolytic Rust Removal - a Detailed Illustrated Tutorial, page 23
4. The Process:
Voltage/Current Control, Hydrogen Embrittlement, Energy Wasted as Heat
2) How To Control Voltage and Current During Electrolysis
Controlling voltage and current during electrolysis is essential for achieving good results without wasting energy through excessive heat, or overheating the power supply. Controlling voltage and current also ensures that your electrolytic setup remains effective throughout the process, i.e. it does not take more time than necessary to derust an iron object.
• Voltage:
The process of electrolytic removal of rust works best with 24 volts DC supplied by a car battery charger. Voltages above 24 volts DO NOT really offer any greater efficiency, and generally cause the energy to get wasted as heat off the electric wires and in the electrolytic solution.
 DO NOT use 120V or 220V AC household circuits - "wall circuit", "house circuit", or any type of mains circuit, for electrolysis under any circumstances! Attempting to do so could be fatal! Besides, the electrolysis does not work with AC current (alternating current).
The lower the voltage, the lower the current, the longer it will take to derust an iron object. The voltage of 12 volts DC can be used for electrolysis if the amperage level is maintained above 5 Amps. In any case, the car battery charger, as a part of the electrolysis machine, MUST have two operational voltage modes - 12v and 24v, for voltage/current control.
• DC Current:
Depending on a size of the iron object or the number of iron objects being derusted, the optimal amperage for the electrolytic rust removal ranges from 5 to 15 Amps.
The amperage (amount of electric current) usually increases and decreases during the process as the amount of current that your electrolytic setup draws depends on any the following six factors:
1) Power supply voltage - the greater the voltage, the stronger the amperage (more current);
2) Size of iron object being derusted (cathode) - the larger the surface area of an object, the more current passes through it;
3) Size of “waste” electrode (anode) - the larger the surface area of an anode, the more current passes through it;
4) Amount of rust on anode and cathode - the more rust (non-conductive material) on anode or cathode, or on both - the less current passes through the setup;
5) Distance between anode and cathode - the shorter the distance, the stronger the current;
6) Concentration of electrolyte - the stronger the electrolyte (only up to ideal concentration - see details in "How To Make Electrolyte" section on page 15) the stronger the amperage (more current);
Increasing the current will certainly ensure faster derusting of an object; however, amperage, just like voltage, must be kept below dangerous levels in order to protect the electrical wires, connections and the power supply from overheating or short-circuiting. When the current flow is far too high, excessive anode erosion will also occur. So when the current is reaching a dangerous level, one must act quickly to reduce it back to acceptable levels.
Controlling the Current Without an Ammeter
Using an ammeter built into the car battery charger is the best means to control the current because the ammeter gives a useful indication of the actual current flowing (see details below). But if your power supply does not feature an ammeter, you can determine when the current level is too high by the electrolyte's hot temperature.
If the ammeter is not available, there are four ways to reduce the current:
1) increasing the distance between the anode and the cathode - this would be inconvenient and hazardous if the anodes and cathodes have been firmly secured inside the container, and failing to secure them again at new positions could lead to accidental touching one another - short-circuiting, during the electrolysis; not during their repositioning as you would have to UNPLUG the battery charger before touching the electrodes!
2) reducing the amount of submerged surface area of the anodes by elevating them out of the electrolyte a little - this takes less time than increasing space between the electrodes, but still the anodes must be firmly secured after each move.
NOTE: Before repositioning or elevating the electrodes, make sure that they are clean of rust, otherwise, after you wire-brush the rust off them, the current will sharply increase again.
3) reducing the voltage (which would also reduce the power consumption) - this seems to be much easier if your car battery charger has a 12v/24v switch, and you just switch the voltage from 24 to 12 volts.
4) diluting the electrolyte - this will take longer than repositioning of the electrodes because it would be hard to determine the optimal concentration of the electrolytic solution even after a few attempts.
Obviously, to INCREASE the current passing through the electrolytic setup, one has to do the opposite to the means described above. In any case, these current-controlling techniques are not practical in comparison to a simple turning of the ammeter's Amperage Knob, especially when you have to derust many iron pieces.
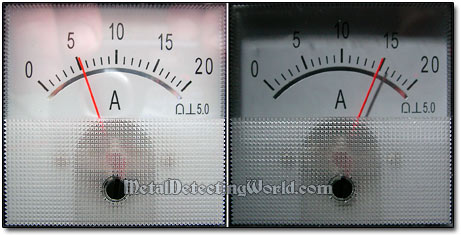
Using Ammeter and Checking Its Readings
Any car battery charger being a part of the electrolysis machine MUST include an ammeter to effectively measure and control the electric current passing through an electrolytic setup. Ammeter readings let you see what is going on in real time, and allow you to react to any changes of the current fast, giving you more time for solving any unexpected problem.
At the start of the process, the low amperage readings (the arrow pointer is almost at zero) may indicate a few flaws such as poor connections to the iron piece, low strength electrolyte, etc., in your electrolytic setup. The setup is working fine when the arrow-pointer sets between 2 and 6 amps in the first hour of the process (as shown on the left half of the picture below). To speed up the process a bit, it is ok to increase the current a little over the initial setting by turning the amperage knob to the right.
As more rust is being removed off an iron object, the current is gradually increasing up to the level that you set up last time. On the right half of the picture below, the current level is shown at 15 amps when the electrolytic derusting was in full swing. Now you should decrease the amperage a little - down to 10 amps, by turning the amperage knob to the left.
Ammeter Shows Ampere Readings
After the anodes got coated with rust 3-4 hours later, the current became just a trickle, and this was reflected by the ammeter reading: back to 5 amps. If the anodes are not cleaned at this point, the amperage level will go further down to 2 or 1 amp. When this happens, the entire setup should be cleaned immediately (UNPLUG it first!).
These increases/decreases of the dc current will occur a few times during derusting of just one iron object. So one must keep an eye on the ammeter, or frequently check its readings. Not enough current, and the electrolysis will take forever. Too much current, and the wires, connectors, and even the battery charger will be fried.
What is hydrogen embrittlement?
The electrolytic reaction supplies electrons to hydrogen ions in the electrolyte, changing them into hydrogen gas: the more current, the more hydrogen. When the applied current is too high, the smallest hydrogen atoms from the electrolyte can be forced between the iron molecules on the surface of an object being derusted. This can affect the surface to the point of micro-cracking that may be visible only under a microscope.
It is more likely to happen when the current is set on a highest level possible to achieve rapid derusting. In many cases of cleaning the artifacts, this will not be a concern. But in case of cleaning a machinery part, attempting to derust the iron part too fast may cause an irreversible mechanical damage that can lead to a bad accident.
Wasting Energy through Heat
The heat is usually caused by electrical resistance of 1) the wires that are too thin - their gauge is not proper for the voltage setting (see details in the "Basic Electrical Tools, Accessories" section on page 10), or 2) the sacrificial electrodes - anodes, when they get coated with the accumulated rust, and are not cleaned for a long while (see details in the "Cleaning Rust Off Anodes" section on page 24).
Heat does not add anything to the process, other than wasting electricity. The only time the heat becomes exceptionally useful is when you run your electrolytic setup outdoors in sub-zero temperatures during the winter - the heat keeps the electrolyte unfrozen.