Remove Tarnish From Silver Coins by Electrochemical Reduction - Tutorial, p. 3
How To Clean Corroded Copper and Tarnished Silver Coins by Galvanic Method
(...CONTINUED from Previous Page)
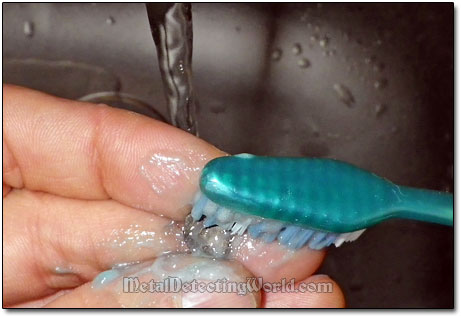
Step 9. Allow the coins to "simmer" for 15 minutes and then take one coin at a time to toothbrush it with toothpaste under running water and see how much tarnish you have removed. The coin will have dark coating or spots every time you take it out for cleaning but most of this coating will be easily removed with the brush, toothpaste and water. The toothpaste has microfine abrasives that help remove the tarnish residue and the products of reaction.
Frequent brushing and examining the coins will allow you to estimate the time required to complete the electrochemical cleaning process. Then rinse the coin and put it back into the galvanic cell. With this method, there is no risk to "overclean" the coins as the coin metal does not get affected by the redox chemical reactions.
Brushing Silver Coin During Galvanic Cleaning
Step 10. Change the electrolytic solution right after you are done brushing the last coin. But do NOT add the solution to the bowl if the electrolyte's level has decreased during the process! If you do not want to change the solution, just add distilled water to the bowl because only the water has evaporated while the amount of the dissolved baking soda in the solution has remained unchanged. This is not really crucial for this cleaning process, but it is extremely important in other cleaning methods such as Electrolysis in which increasing the electrolyte's strength may lead to dreadful consequences.
Step 11. For better and quicker results, repeat the Steps 9 and 10 every 15 minutes, and keep doing that until you observe satisfactory results. It took me 45 minutes to remove the tarnish off my six hammered silver coins.
Step 12. After you brushed the coins for the last time and did not spot any traces of tarnish on their surfaces, rinse the coins well under the running water and then soak them in the distilled water for a little while to remove any traces of electrolyte. Dry them with a hair blower and finally immerse the coins into Acetone for 2 minutes to remove the remaining molecules of water. What you do next is up to you but you must act quickly to conserve the coins. You can either artificially patinate the silver coins just to give them an "old look" or simply preserve them "as is" by coating the coins with microcrystalline wax for protection against environmental effects.
Unprotected surfaces of silver coins, if constantly attacked by reactive chemical elements, may tarnish in three months. To inhibit tarnishing of silver coins inside display cases, desiccated silica gel (to keep the humidity low) and activated charcoal (to remove tarnishing gases) are used.
It is recommended to wear clean cotton or plastic gloves for handling the silver coins otherwise the skin's corrosive salts, oils and acids would mark the coins and leave fingerprints on them. For example, sodium chloride (the same as table salt) on human skin reacts with silver to produce silver chloride - a white or transparent compound found as a constituent of corrosion of silver; however, if dust and grime combine with this silver chloride corrosion layer, the coin's tarnish coating can turn into a darker colour. And if it is a part of encrustation, it would be hard to remove.
The silver coins should be handled by their edges. It is also best to wash and degrease the coins, even if they do not look dirty, before placing them in holders.
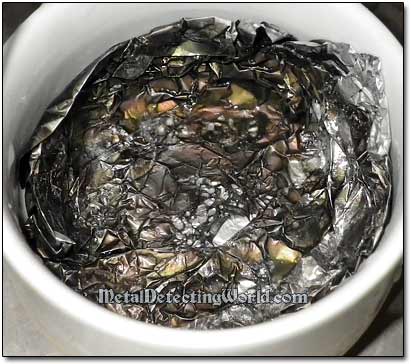
Shown below is a picture of the aluminum foil that got oxidized during the process. Because my coins are very small in size, not much foil has been consumed by the electrochemical oxidation reaction. In cases of cleaning large silver coins, much more aluminum foil is usually used up during the process.
Oxidized Aluminum Foil After Galvanic Removal of Tarnish from Silver Coins
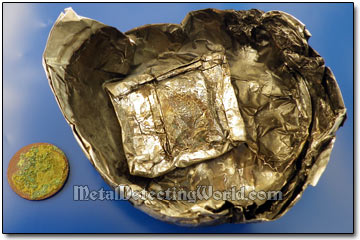
Now let us take a look at the results of the electrochemical cleaning of the encrusted copper coin. Even though the aluminum foil looks very oxidized, the coin cleaning results do not look very joyous.
Oxidized Foil After Electrochemical Reduction Cleaning of A Copper Coin
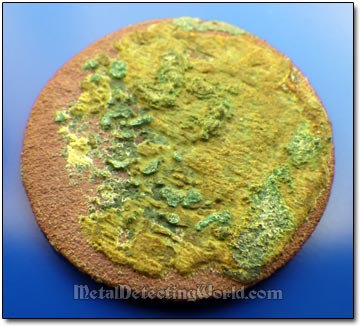
The coin does not look like it has been electrochemically cleaned for an hour. The main reason for such a terrible outcome is that a good electrochemical contact between the coin and aluminum foil could not be established due to the thick nonconductive encrustation which acted as insulator between the foil and the coin metal. As a result, the galvanic cell did not gain a full electrode potential between its components. This is why the electrochemical reduction cleaning method is not useful for the badly corroded or "Bronze Disease infected" copper-base alloyed coins.
Hard Encrustation On Copper Coin After 1-Hour Galvanic Cleaning
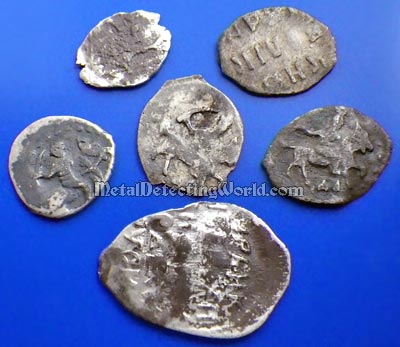
As for my hammered silver coins, the results of their cleaning are just amazing! All tarnish has been completely removed, and the coins do not look like they had been "tough" cases prior to cleaning. I am glad that the cleaning process for these coins has finally ended, and I definitely do not have to zap the coins using Electrolysis. I am only wondering if this merry culmination has happened due to my doing everything right or the "lucky" pebble... :)
Hammered Silver Coins BEFORE Galvanic Cleaning...
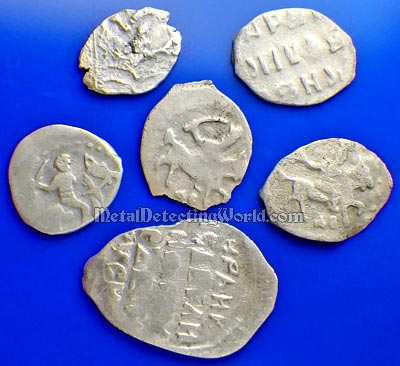
...Same Hammered Silver Coins AFTER Galvanic Cleaning
Happy Galvanic Coin Cleaning!
Back to 'Cleaning Silver Coins page 16'