Electrolytic Removal of Rust - A Detailed Illustrated Tutorial, p.35
7. Multiple-Part Electrolysis: Starting Up the Process
After you placed and secured the anodes in the electrolyte, and set (but NOT yet secured) the multiple-part hanger with suspended relics onto the container, connect a negative power clamp to the cathode grid on the hanger, and the positive clamp - to one of the anodes which are connected to each other by a connecting set (see details in the "Setting Up Correct Polarity" section on page 21).
Make sure that everything is in place and attached. Set your battery charger to the 24 volt range, and set the ammeter control knob in a medium position. Plug in your battery charger, turn it on, and observe the iron relics in electrolyte. Your further action would depend on what happens next:
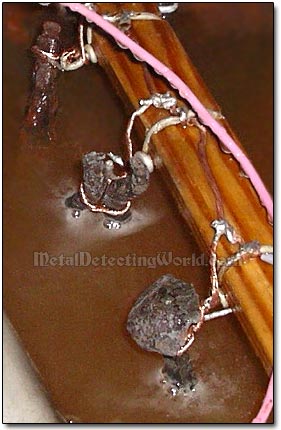
1. After a few seconds have passed, you see hydrogen bubbles emerging off the iron relics.
Hydrogen Gas Is Bubbling Off
The bubbling action means that the electronic circuit is completed, and dc current is flowing through your electrolytic setup. But it does not mean that everything is absolutely fine.
Closely inspect every iron relic for absence of bubbling action around it to make sure that all relics are being engaged in the process. There may be just a trickle of bubbles around the heavily rusted artifacts, and it may take some time for these artifacts to lose some rust and get with a program.
You should not worry about some relics getting derusted faster than the rest of the group and continuing to be electrolyzed because electrolysis cannot damage them. The entire group of relics can undergo the electrolytic de-rusting until the last relic is done.
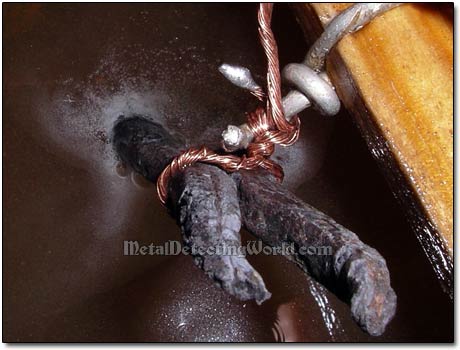
If you do not see any action around one or two relics, it means that the contacts between the relic(s) and either the cathode wire or electrolyte have not been established.
Out of These Three Artifacts, One Artifact Is Not Being Well Connected
You should do the following:
1) Turn off the power (or unplug the car battery charger).
2) Remove the negative (black) power clamp from the multiple-part hanger.
3) Remove the hanger.
4) Detach those relics where no action have been observed.
5) File any remaining rust off the contact points on the relic(s) until you see bare metal.
6) Re-attach the relic(s) to the multiple-part hanger.
7) Restart the process - turn the power on.
If now the hydrogen bubbles appear on all relics in the group, the system is working absolutely fine. And NOW you should SECURE the multiple-part hanger in its place: 1) Unplug the power source, 2) affix an aluminum stopper-bracket or clamp to both the hanger and the container's rim, and 3) Turn the power back on.
2. If NO bubbling action is observed on ALL relics suspended in electrolyte, you need to do the following steps:
1) Put the rubber gloves on (DO NOT touch anything without gloves!) because the power has to be ON at this moment.
2) Remove the negative power clamp from the multiple-part hanger.
3) Immerse the negative power clamp into electrolyte for a couple of seconds and observe all electrodes:
a. If the bubbles begin coming off both the clamp and the anodes, then the electric grid on the hanger caused the malfunction. The grid should be inspected and fixed.
Oxygen Bubbles Coming Off the Anode

b. If no bubbles appear on all electrodes again, re-attach the negative power clamp to the multiple-part hanger, and continue to the next step.
4) Remove the positive (red) power clamp from one of the anodes.
5) Immerse the clamp into the electrolyte for a couple of seconds and observe all electrodes:
a. If the bubbling begins both at the clamp and at the suspended relics, the malfunction was caused by the anode which was connected to the power source.The anode should be cleaned of rust with a steel wire brush.
b. If the bubbles still do not appear on all electrodes, re-attach the positive power clamp to the anode, and re-read the "Starting the Process of Electrolysis" section on page 22.
After having started the process successfully, SECURE the multiple-part hanger in its place, and proceed with the operational steps covered in chapter 4, starting with the "Controlling Voltage and Current" section on page 23.