Rust Removal by Electrolysis - A Detailed Illustrated Tutorial, p.19
3. Preparations and Assembly of Electrolytic Setup:
How To Place Iron Artifacts in Electrolyte Properly and Set Correct Polarity
6) How To Place Artifacts in Electrolyte Properly
Proper placement of the iron artifacts and other objects into electrolyte is critical for the process. To make sure the artifacts are properly set up in a container, follow these simple rules:
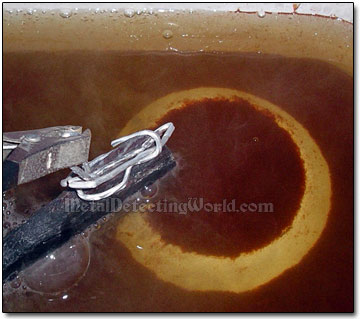
Objects To Be Derusted MUST NOT touch the anodes, and should be positioned immovably inside the container so that they cannot fall onto the anode(s) or on the container's bottom where both the crud and rust gradually accumulate and pile up. The artifact's contact with the bottom sludge may cause shorting of the power supply, or wasting the current by passing it through the bottom sludge.
 To avoid these problems, you can place the artifact onto a non-conductive stand that would keep the iron object one inch above the bottom. As in the case of insulating the anode from the container's bottom, the inverted deep saucer can serve the purpose.
Artifact Is Placed on Saucer (partially visible through accumulated sludge)
Another option is to hang your iron relic in the electrolytic solution. It is best to support it with a piece of wire hanging from a wooden stick. I keep the iron objects suspended during the multiple-part electrolytic rust removal (see an example in the "Multiple-Relic Electrolysis" section on page 34).
Iron Relics Are Suspended in Electrolyte
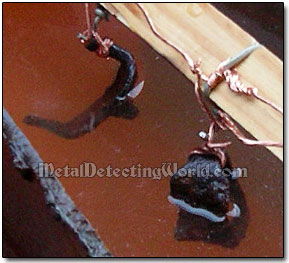
Because the cathode is not immersed in solution, and, therefore, a small area of the iron object, to which the cathode is attached, is not being treated, the iron object does not get fully derusted at a time. The remaining rusty area is treated in its turn, and if you process it a little longer than necessary, there will be no visible difference between the object's two areas being derusted individually. So there is nothing to worry about!
7) Setting Up Correct Polarity
The following setup was made just to clearly illustrate the proper way of connecting all power cables and electrodes, and the steps of the process, but in reality I use a different setup with a larger container, larger waste electrodes, and more connecting sets.
Not to make a mistake in setting correct polarity of your electrolytic setup, follow these steps:
1) With power turned off, attach the positive power clamp (red) from the power source to the "central" anode 1 - a piece of a stainless steel pipe as shown on a picture below.
2) Use a connecting set to link the anode 1 to the anode 2 - a mild-steel plate.
3) Use another connecting set to link the anode 2 to the anode 3 - a stainless tea spoon. Now all anodes have become one big anode.
4) Attach the negative power clamp (black) from the power source to the cathode - the steel wire, that is wound around the iron artifact. Now the setup is complete!
5) Double check all of your connections. If everything is wired up correctly, turn the power on!
Correct Polarity in Electrolysis Setup
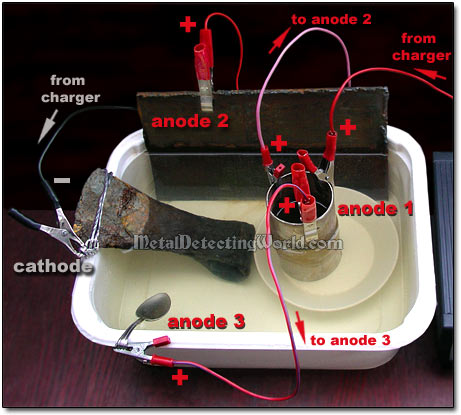
The golden rule for setting the correct polarity of any electrolytic setup is this: The POSITIVE power clamp is connected to the ANODE, and the NEGATIVE power clamp is connected to the ARTIFACT. Otherwise, you will be cleaning the "waste" electrode and destroying your artifact.
NOTE: The rusty iron objects consisting of two and more components that cannot be separated, must have all their parts individually connected to the cathode; thus, making one big cathode. One should not assume that the rusty components will be electrically connected simply by their close physical contact with each other.