Rust Removal with Electrolysis - A Detailed Illustrated Tutorial, p.32
7. Setting Up Multiple-Part Electrolysis: Making Electrical Grid - How To Coat Wire Ends with Solder, How To Solder
In simple words, Soldering can be defined as "adhering two metal surfaces with molten lead-tin alloy (solder) that has a low melting point". Soldering is used in all sorts of electrical and electronics work. In this tutorial, only the simplest of the most common types of soldering - soldering a spliced wire joint, is covered.
Tools and Accessories for Soldering
To solder the wire joints, you need to have the following set of simple tools:
1) Soldering Iron would help! A stand for the soldering iron is a MUST. The stand should be made of metal, glass, or ceramics, NOT wood or plastic. Not having a stand for my soldering iron, I use a regular glass ashtray as it has special notches at the rim for holding cigarettes, and holding the iron's tip - nothing could be better than that!
2) Solder - this is the main component in soldering. When the solder is heated and becomes molten metal, it is transferred onto the wire joint, and when the solder cools, it solidifies making a firm bond between the wires. The most common solder is made of a lead-tin alloy with a rosin core, has a low melting point, and usually comes in a form of coiled wire.
3) Rosin or Colophonia Resina (in a pill-box container) - rosin is the precursor to the flux. The lead-tin solder has about 1% of rosin as a flux core helping the molten solder flow and make a better connection.
4) Flux (in a bottle) - the soldering flux is usually contained in solder and allows the solder to flow easily on the wires and contacting parts rather than forming beads. It also serves as a heat transfer medium, facilitating heating of the joint by the soldering tool or molten solder. The flux prevents formation of oxides.
5) Bent Nose Pliers or Long Nose Pliers - a very practical tool used for holding wires and parts in place during soldering.
Tools and Accessories for Soldering

Safety Precautions
Because soldering a few wire joints in your electrolytic setup is just a one-time job, you do not need a soldering setup like this:

However, there are four safety precautions to keep in mind:
1) High temperatures - Soldering iron is heated up to 350°F or higher, and may cause burns very quickly. Make sure to use a stand to support the soldering iron, do not overcrowd your working space with parts, tools, etc., and keep the iron's power cord at the spot where it could not be accidentally pushed. In other words, have enough working space to lay parts out and move around without burning yourself or anything, and knocking the hot soldering iron off.
2) Fumes from Flux - the flux in the solder, when it is heated, will release fumes that are irritating to eyes and lungs. You should NOT put your face directly above the soldering, and inhale the fumes released. Soldering should be done in a well ventilated area.
3) Molten solder - it can burn your skin when dripping on it. Avoid soldering over exposed body parts, and splashing the solder onto your face. Protective gloves and safety glasses are advised.
4) Lead in solder - most solders contain lead, so you should NOT touch your face while soldering. Always wash your hands after touching the solder.
Coating Wire Ends with Solder
 The first thing you should do is TINNING. Tinning is the process of coating an iron's tip with a thin layer of solder. This aids in heat transfer between the tip and the electrical wires you are soldering, and also gives the solder a base from which to flow. After the soldering iron has fully come to temperature, run the solder wire up and down the tip and around it to thoroughly coat it with molten metal. As a considerable amount of solder will be used for tinning, some of the molten solder will be dripping, so be prepared for it.
Tinning should be done when you use a new tip or after you clean it so that the soldering iron maintains good heat transfer while soldering numerous components in an electronic circuit like PCB - Printed Circuit Board. But for this easy and small project of soldering just a few wire ends and joints, tinning is really not necessary. Just do not use thick solder wire which would be harder to heat up.
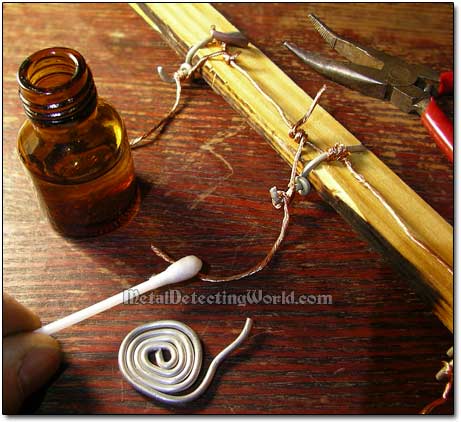
Now, start the project with coating each wire electrode's terminal with solder. This would keep all wire strands tightly together so they would not come apart during multiple usage. I took a Q-Tip, dip it into the flux, and applied the flux to the bare wire terminal.
Applying Soldering Flux to Wire End
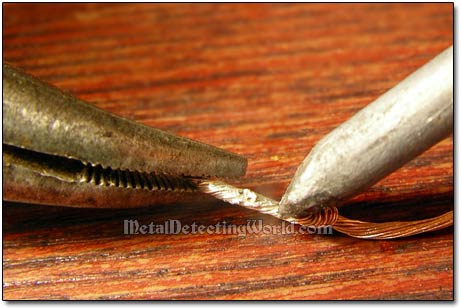
The soldering iron had been heated up by this moment. While holding the wire with a small set of bent-nose pliers, I applied heat to the wire using the thicker section of the soldering tip. The flux would fuse and fully encompass the wire strands aiding in heat transfer. This would be the best moment to apply the molten solder to the wire terminal. With the flux applied, the solder will be quickly sucked in the wire strands.
Coating Bare Wire End with Solder
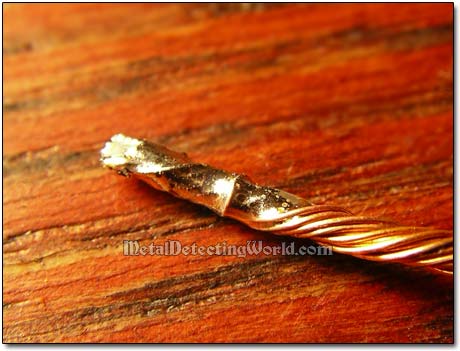
It is much easier to apply more solder on the solder-coated wire, so to harden the wire terminal, I put a little more solder on it. The solder strand should be placed upon the wire and heated simultaneously along with it as shown on a picture below.
Adding More Solder on Wire Terminal
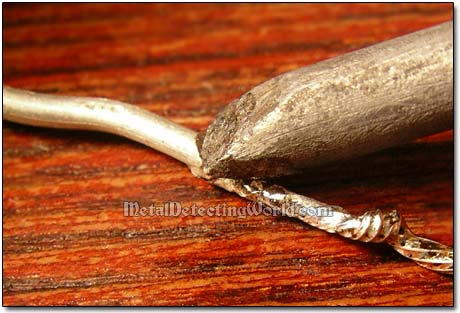
The solder-coated wire length should not be too long, so I shortened it with a set of side cutters. Then I treated the other five wire terminals the same way.
Bare Wire End Perfectly Coated with Solder