Rust Removal with Electrolysis - a Detailed Illustrated Tutorial, p.15
2. Making a Simple Electrolytic Setup:
How To Make Electrolyte, Choosing a Proper Place for Setup
(...CONTINUED from Previous Page)
6) How To Make Electrolyte
Making an electrolyte is as simple as dissolving sugar in your cup of coffee! Only now you are dissolving either washing soda (or "soda ash") or baking soda (also "bread soda" and "cooking soda") in water. And you do not have to measure a precise amount of soda you use to make an electrically conductive solution - electrolyte.
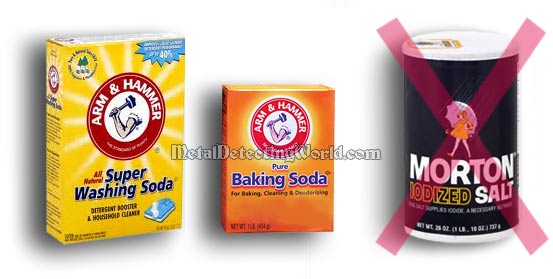
Many professionals claim that washing soda is more useful for electrolytic cleaning than baking soda because the washing soda is routinely used to remove oil, grease, and certain minerals. Thus, besides providing ions to form electrolyte, it also provides a secondary benefit in electrolytic derusting, as the rusted iron object likely contains these minor contaminants. All that is true; however, the washing soda is a skin irritant.
From my experience with electrolysis, I found out that the baking soda electrolyte is as effective as the washing soda solution, provides satisfactory results, and harmless - it does not irritate the skin. And the minor contaminants - oil, grease and minerals, can be easily washed off the iron artifact with acetone (see details in the "Displacing Water from Iron Surface" section on page 29) anyway. In case you wish to use the washing soda and are too lazy to go to the supermarket or drugstore to get it, you can use baking soda to make the washing soda at home.
Since the baking soda (sodium bicarbonate or sodium hydrogen carbonate - 2NaHCO3) differs from the washing soda (sodium carbonate - Na2CO3) only by the presence of moisture and carbon dioxide (CO2) in it, you can easily get rid of these two components. Just put some baking soda onto a frying pan or a cookie sheet, and bake it in the oven at a little over 300°F (149°C) for an hour. Baking soda will become washing soda after the carbon dioxide and water molecules are dried off by heat:
2NaHCO3 -> Na2CO3 + H20 + CO2
A Few Words About TABLE SALT:
Some enthusiasts use table salt to make an electrolyte, and probably are not aware of the hazards associated with toxic chlorine gas and its immediate harmful effect to their health.
 DO NOT use TABLE SALT in your electrolytic solution! The electrolytic solution made with the table salt will generate CHLORINE GAS that can injure you, and quickly!
When table salt (sodium chloride - NaCl) is placed in water, the salt (a solid) dissolves into its component ions, according to the dissociation reaction:
NaCl(solid) → Na+(aqueous) + Cl−(aqueous)
Then when the electrolysis starts, a gaseous mixture of Chlorine (Cl2) and Oxygen (O2), begins to evolve bubbling off the anode. The chlorine will dissolve back into the electrolyte at first, but as the electrolyte gets saturated with the chlorine, the bubbles will come out of solution and rise up along with the oxygen in the mist directly above the bath.
NOTE: Special attention should be given to those iron artifacts that have rusted in a salt-water environment! They should undergo as many soakings in water as possible to leach all salt molecules out of the porous iron surface.
There is another hazard that can be caused by the chlorine during electrolysis. The hydrogen gas is bubbling off the cathode during the process, and if the chlorine is combined with the hydrogen, it will react violently making Hydrochloric Acid - "Houston, we've got a problem!"
Use Washing or Baking Soda, NO Salt!
Other hazards are created when people try to speed up the process by adding lye (caustic soda) and even drain cleaners into an electrolyte. Lye (sodium hydroxide) is a powerful base and is very harmful: it will immediately damage the skin on contact, so appropriate protection must be used.
I would caution anyone against using lye and drain cleaners (full of contaminants) in the electrolyte! It has been proven that no appreciable increase of the process speed is achieved by using lye or any other harmful "addition". Is it really worth of taking the risks associated with usage of the hazardous material and disposal of caustic solution?
Water Used in Electrolyte:
It is generally recommended that only distilled water (available at most supermarkets) or de-ionized water should be used for making the electrolyte. The tap water may contain certain minerals or chemicals that could be deposited on iron objects or interfere with the process.
For example, the tap water is suspected of contributing to the formation of carbonate precipitate - black coating, on the derusted iron objects (see details in the "What Is the Black Coating and..." section on page 27). I use the tap water, and then just have to put more efforts into cleaning the iron piece afterwards.
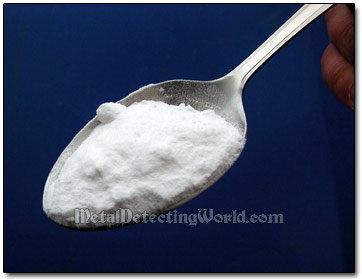
Amount Of Soda To Make Electrolyte:
Recommended by different sources, the ratio "soda-to-water" for making electrolyte ranges from "one table spoon of baking soda per five gallons of water" to "one tablespoon of washing soda per one gallon of water". I use the latter ratio for my electrolysis projects.
One Table Spoon of Baking Soda per One Gallon of Water
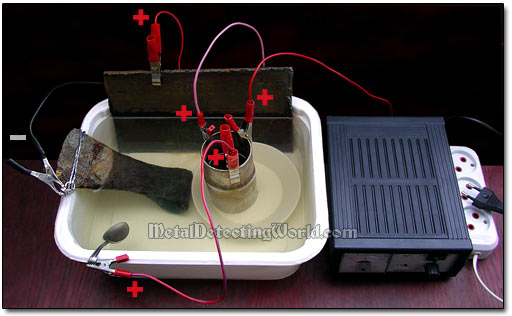
If you use a battery charger with an ammeter, there is a simple way to determine an optimal amount of baking soda required for the amount of water in the container of any volume; no calculations and measurements are needed. After you place the electrodes and iron object into the container and connect everything (all details are covered in the following chapters), fill the container with water (electrode connectors are not immersed!), set the amperage controlling knob in a middle position, turn on the battery charger, and slowly add a small amount of baking (or washing) soda into the container while stirring well, so all soda is quickly dissolved.
Now watch the ammeter indicator hand (or pointer) while adding more soda: the pointer will move slow at first, but then will go faster, as the soda's concentration in solution is increasing. When the pointer stops (amperage stops rising rapidly), the amount of soda in the solution is optimal, i.e. not too much current passes through the electrolyte to get the job done, so the power supply - your battery charger, will not be overloaded, and any connecting wires will not be burnt. Your electrolyte is ready! And your electrolysis machine can remove rust from your valuable iron artifacts!
A Simple Electrolytic Setup for Removing Rust
For How Long Can Electrolyte Be Used?
If it was not for the by-products and contaminants - any substances besides baking or washing soda, that get into the electrolyte from water, anodes, cathodes, and iron objects, and then gradually build up a huge disgusting mess in the container, one could use the electrolyte forever. One just would have to refill the container with water which is converted into oxygen and hydrogen gases during the process.
But in reality this can be possible only if the platinum or graphite anodes are used. Otherwise, the crud, loosened rust and contaminants make the electrolyte unusable after 4-6 hours, and, at this point, it is time to change the electrolyte and precipitants (see details in the "Crud and Precipitated Rust Disposal" section on page 41), and the electrolyte vat should be thoroughly cleaned.
Any residue of salt, grease, oil and dirt should be cleaned off the IRON OBJECT beforehand in order to avoid obvious contamination of the electrolyte. Failing to remove the contaminants will slower the process and shorten the life of the electrolytic solution.
7) Choosing a Proper Place for Setup
Because the electrolytic rust removal generates hydrogen gas, one has to make sure the hydrogen gas and its mixture with oxygen - another by-product of electrolysis, do not accumulate to reach an explosive concentration. This is why the procedure must be conducted in a very well ventilated area, and away from anything that can produce sparks or flames.
For your safety and safety of your home, your electrolytic de-rusting should be conducted outdoors! (all aspects of safety will be covered in the "Safety Precautions" section on page 40) As the battery charger normally is not designed for outdoors conditions, you should keep it indoors, and just run the connecting cables through a door to the electrolyte container placed outside your home.
Rain and/or snow would not affect the process unless rain or snow precipitation is heavy enough to substantially dilute the solution. Freezing temperatures will not affect the electrolyte which will remain warm during electrolysis. The place of your electrolytic setup should be fairly isolated from human and animal traffic.